

When Your Basement Becomes an Indoor Swimming Pool
Basement flooding remediation is a critical process that homeowners must tackle quickly to prevent extensive damage and health hazards. Here’s what you need to know immediately:
Essential Steps for Basement Flooding Remediation:
- Safety First – Turn off electricity and gas, wear protective gear
- Stop the Water Source – Find and fix the leak if possible
- Remove Standing Water – Use pumps, wet vacuums, or buckets
- Dry Everything Thoroughly – Deploy fans, dehumidifiers, and open windows
- Clean and Disinfect – Remove damaged materials and sanitize surfaces
- Document for Insurance – Take photos and contact your insurance company
- Prevent Future Flooding – Address root causes and upgrade systems
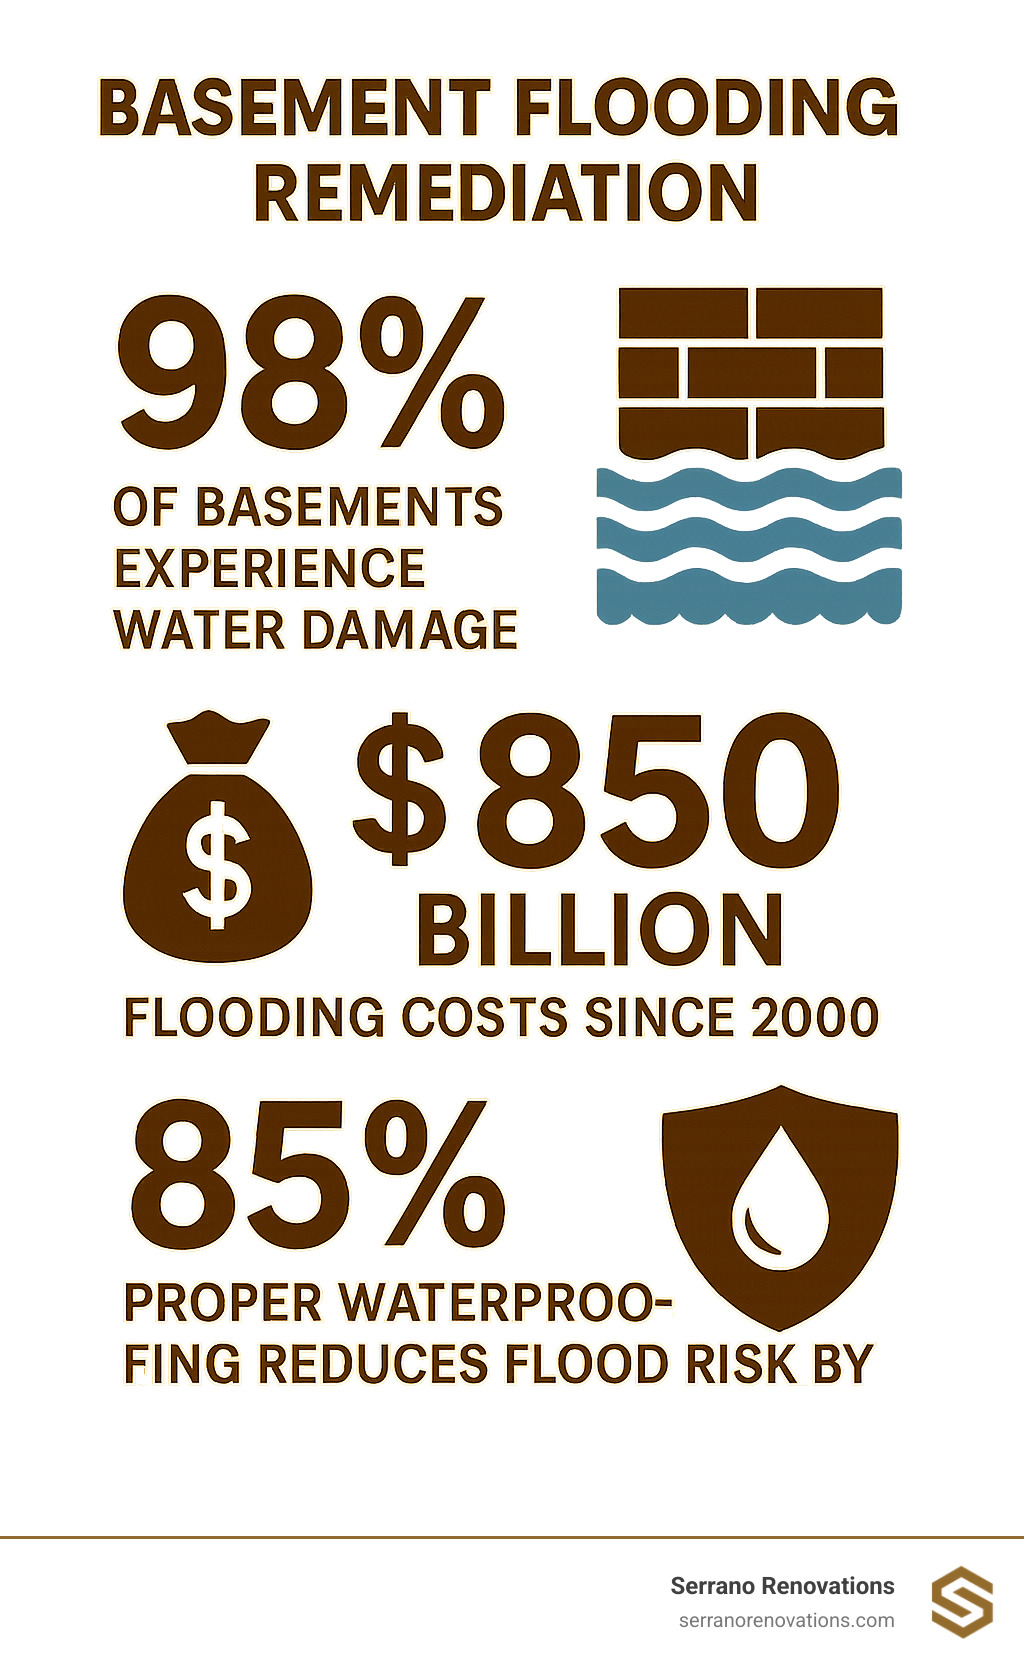
Too many homeowners have descended their basement steps to find a pool of murky water. If you’re one of them, you’re not alone. Research shows that 98% of basements in the U.S. are impacted by water damage during their lifespan.
The clock starts ticking the moment you find flooding. Mold can begin growing within 24 to 48 hours of water exposure, and it can take up to two weeks for a flooded basement to completely dry – or up to six weeks for wood floors.
But here’s the good news: with the right approach, you can turn this nightmare into a manageable project. This guide walks you through each step of basement flooding remediation, from immediate safety measures to long-term prevention strategies.
The key is acting fast while staying safe. Whether you’re dealing with a burst pipe, heavy rainfall, or a failed sump pump, the fundamentals remain the same: prioritize safety, remove water quickly, dry thoroughly, and address the root cause.
Step 1: Safety First – Immediate Actions for a Flooded Basement
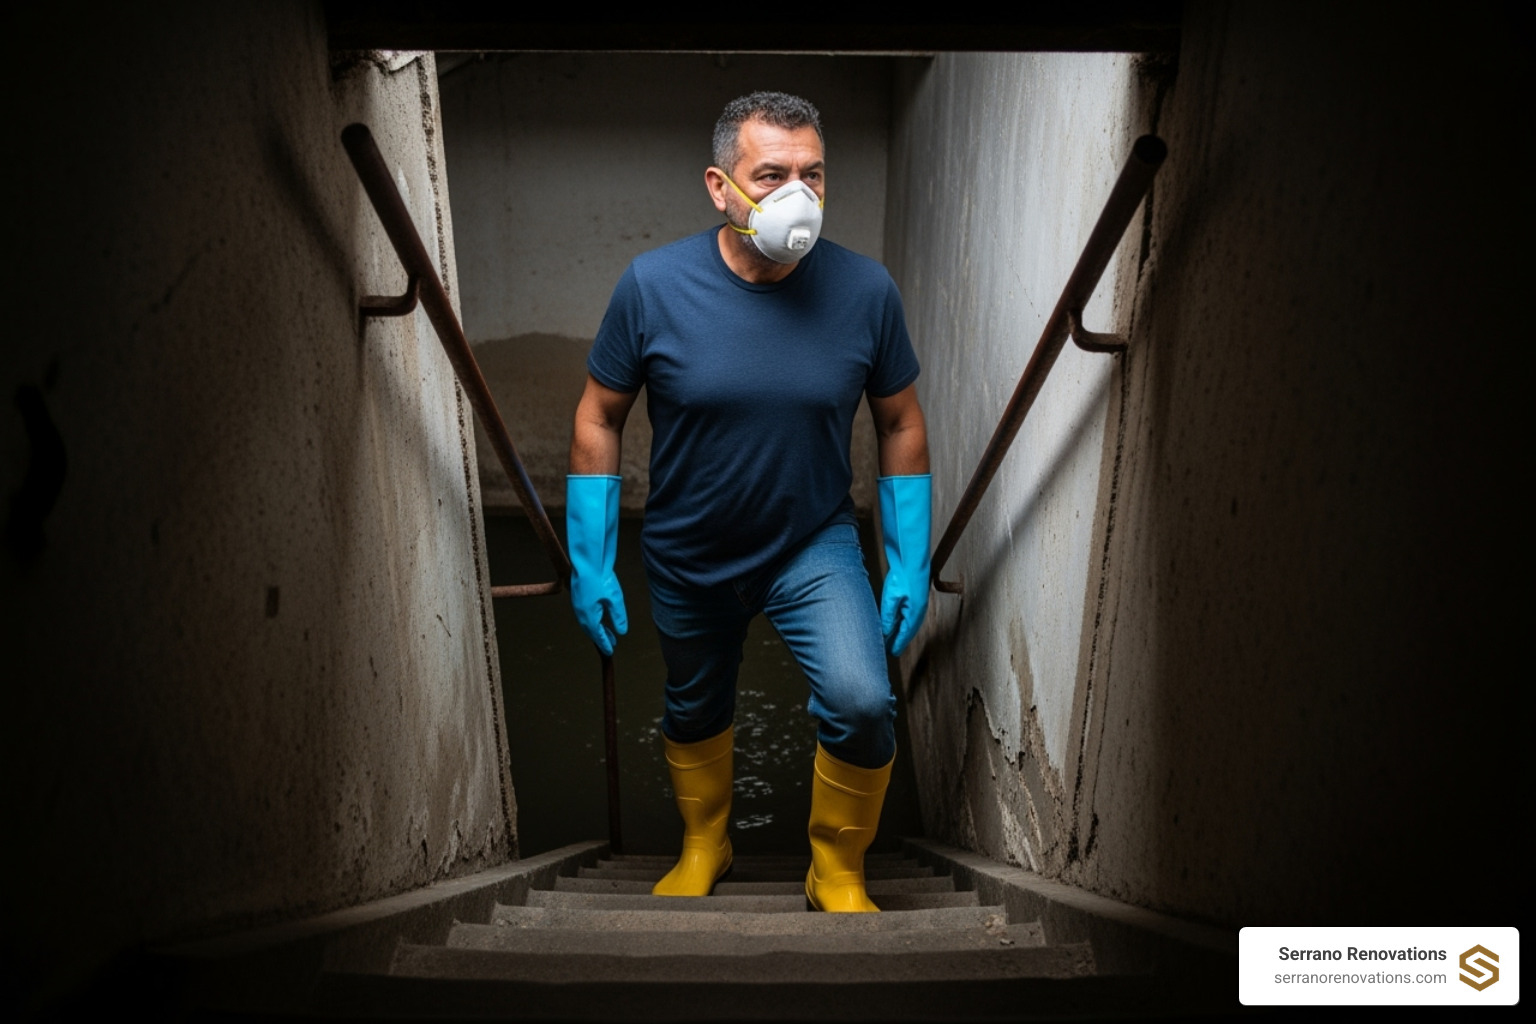
I know you’re probably staring at your flooded basement thinking, “I need to fix this right now.” But hold on – before you wade in like a superhero, let’s talk about staying alive and uninjured. A flooded basement isn’t just messy; it can be genuinely dangerous.
Water and electricity are mortal enemies, and your basement might be hosting their deadly reunion. Never – and I mean never – walk into standing water without checking the electrical situation first. If your circuit breaker box is in the flooded area, don’t try to be a hero. Call a licensed electrician immediately.
If you can safely reach your main electrical panel from outside the flooded zone, turn off power to those basement circuits. The National Electrical Manufacturers Association doesn’t mince words here – any electrical items that got wet need to go in the trash. Yes, even that expensive dehumidifier you bought last year.
Gas leaks are another silent threat lurking in your flooded basement. When water rises, it can snuff out pilot lights on your water heater, furnace, or other gas appliances. If you catch even a whiff of gas, don’t stick around to investigate. Get everyone out of the house and call your gas company from a safe distance.
Now, about suiting up for this basement flooding remediation trip. You’re going to need some serious protective gear, and no, your old sneakers won’t cut it. Waterproof boots or waders are essential – think of them as your armor against contaminated water. Heavy-duty rubber gloves will protect your hands from whatever nasty stuff is floating around in there.
Don’t forget an N95 or N100 face mask. Floodwater loves to pick up bacteria, chemicals, and other microscopic troublemakers on its journey through your basement. Even water that looks relatively clean can become a petri dish of nastiness after sitting for a while.
Your camera is your best friend during this process. Before you move a single soggy box, document everything. Take photos and videos of the water level, damaged items, and the overall mess. Your insurance company will want to see proof of what happened, and your future self will thank you for being thorough. Call your insurance agent as soon as you can safely do so – preferably within 24 hours.
Who to Call and When
Some situations call for backup, and knowing when to wave the white flag can save you time, money, and potentially your life. Call an electrician immediately if water is anywhere near your electrical panel or if you have any doubts about electrical safety. Bring in a plumber to track down and stop internal leaks – they have tools and expertise that can save you from playing detective with your pipes.
Contact your insurance agent within the first day to get your claim started. Don’t wait until you’ve cleaned everything up, thinking you’re being helpful. Insurance companies want to see the damage as it happened.
For severe flooding, sewage backup, or when the damage feels overwhelming, it’s time to call in professional restoration experts. If you’re in South Florida – including areas like Margate, Boca Raton, or Miami – consider reaching out to experienced Home Restoration Contractors Near Me who understand our unique climate challenges and local building requirements.
There’s no shame in calling for help. Sometimes the smartest thing you can do is recognize when a job is bigger than what you can handle safely on your own.
Step 2: The Big Dry – Water Removal and Drying Techniques
Once you’ve secured the area and addressed safety concerns, you’re ready for what I call the marathon phase of basement flooding remediation. This is where the real work begins – and honestly, it’s where most homeowners either succeed or get overwhelmed.
Your water removal strategy depends entirely on how much water you’re facing. If you’re dealing with shallow water (less than 2 inches), you can handle this with towels, mops, and a good wet-dry vacuum. It’s tedious work, but manageable for most homeowners.
For deeper flooding, you’ll need to bring in the heavy artillery. A submersible pump can move large volumes of water quickly – think of it as your best friend during this phase. Once the pump has done the bulk of the work, you’ll still need buckets and mops for the final cleanup.
Here’s something many people miss: water loves to play hide and seek. It sneaks behind appliances, pools under stairs, and seeps into wall cavities. Don’t declare victory until you’ve checked these sneaky hiding spots. I’ve seen too many homeowners think they’re done, only to find a puddle behind the water heater days later.
The drying phase is where patience becomes your superpower. Industrial fans are absolutely essential here – they create the air circulation that speeds up evaporation. Think strategically about fan placement. You want to create airflow patterns that move moisture away from wet surfaces, not just blow air around randomly.
Dehumidifiers work hand-in-hand with your fans by pulling moisture out of the air. This prevents that moisture from settling back onto surfaces you’re trying to dry. In Florida’s naturally humid climate, dehumidifiers often work better than opening windows, which can actually add moisture to your space.
Critical mold timeline: You have a narrow 24-48 hour window before mold starts making itself at home on damp surfaces. This is why speed matters so much in basement flooding remediation.
Different materials have wildly different drying times. Concrete floors might look dry on the surface but can hold moisture for weeks underneath. Wood floors can take up to six weeks to completely dry, which is why extensive damage sometimes requires professional Flooring Installation services.
How to Effectively Dry Out the Space
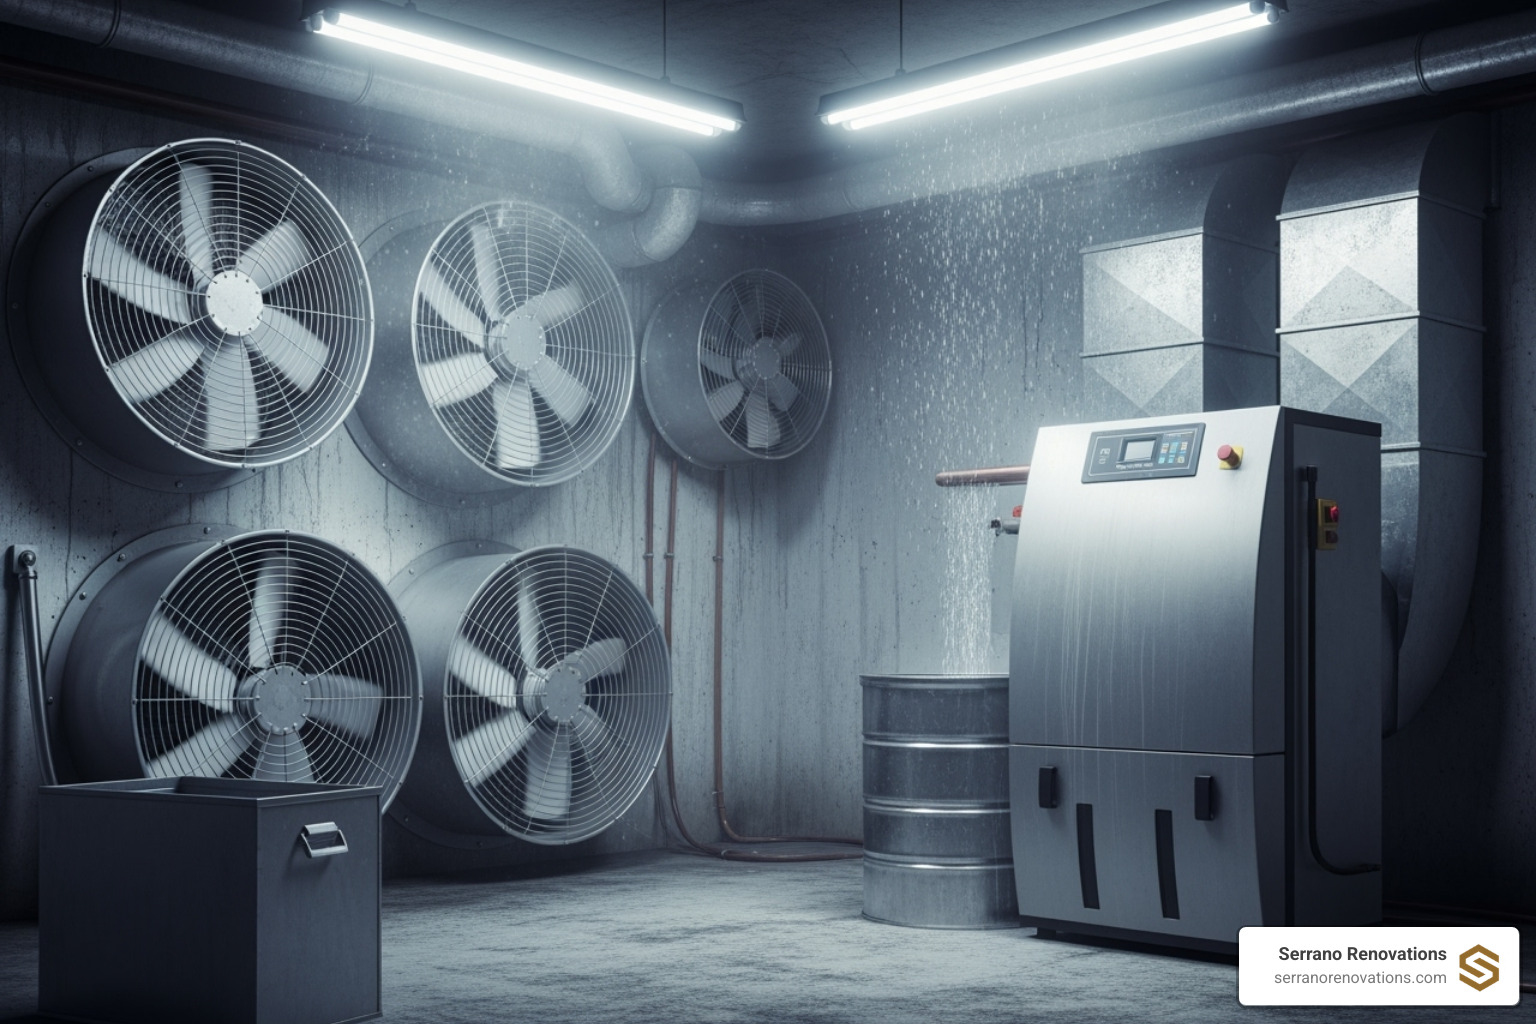
Strategic fan placement makes all the difference between success and frustration. Position your fans to create a cross-breeze pattern that pulls moist air out while bringing dry air in. Here’s a pro tip: place fans at different heights. Some should sit on the floor pointing up, while others should be liftd pointing down. This creates much better air circulation than having all fans at the same level.
Your dehumidifier settings aren’t just “set it and forget it.” Aim to maintain humidity below 50%. In our Florida climate, you might need multiple units or larger capacity equipment to achieve this. Don’t underestimate how much moisture the air can hold down here.
A moisture meter is your secret weapon for knowing when materials are truly dry versus just surface-dry. Professional restoration companies never declare a job finished without using these tools. You can pick one up at most hardware stores, and it’ll save you from making costly assumptions.
Patience prevents secondary damage – and I can’t stress this enough. Rushing this phase often leads to mold growth, warped materials, and having to redo work you thought was complete. It’s always better to over-dry than under-dry, even if it means running equipment a few extra days.
The truth is, this phase tests your patience more than your skills. But stick with it, monitor your progress, and trust the process. Your basement will thank you for taking the time to do it right.
Step 3: The Cleanup Crew – Your Guide to Basement Flooding Remediation
Here’s where basement flooding remediation gets real. You’ve handled the safety issues and removed the water, but now comes the emotionally challenging part: deciding what stays and what goes.
The hardest truth about flood damage is that some things simply can’t be saved. Saturated drywall becomes a soggy mess that will never return to its original strength. Insulation that’s been soaked loses its effectiveness and becomes a breeding ground for mold. That basement carpet you loved? It’s probably heading to the dumpster.
Time is your enemy when it comes to porous materials. The longer water sits in carpeting, particle board furniture, or paper products, the more likely they are to develop mold and bacteria. Even if they look okay on the surface, contaminated water can leave behind invisible health hazards.
Non-porous materials give you better odds. Metal items, solid wood furniture, and glass can often be cleaned and disinfected successfully. The key is acting quickly and being thorough with your cleaning process.
When the damage is extensive or involves structural elements, consider working with professional Design Build Services to rebuild your basement better than it was before.
The Core of Basement Flooding Remediation: Cleaning and Disinfecting
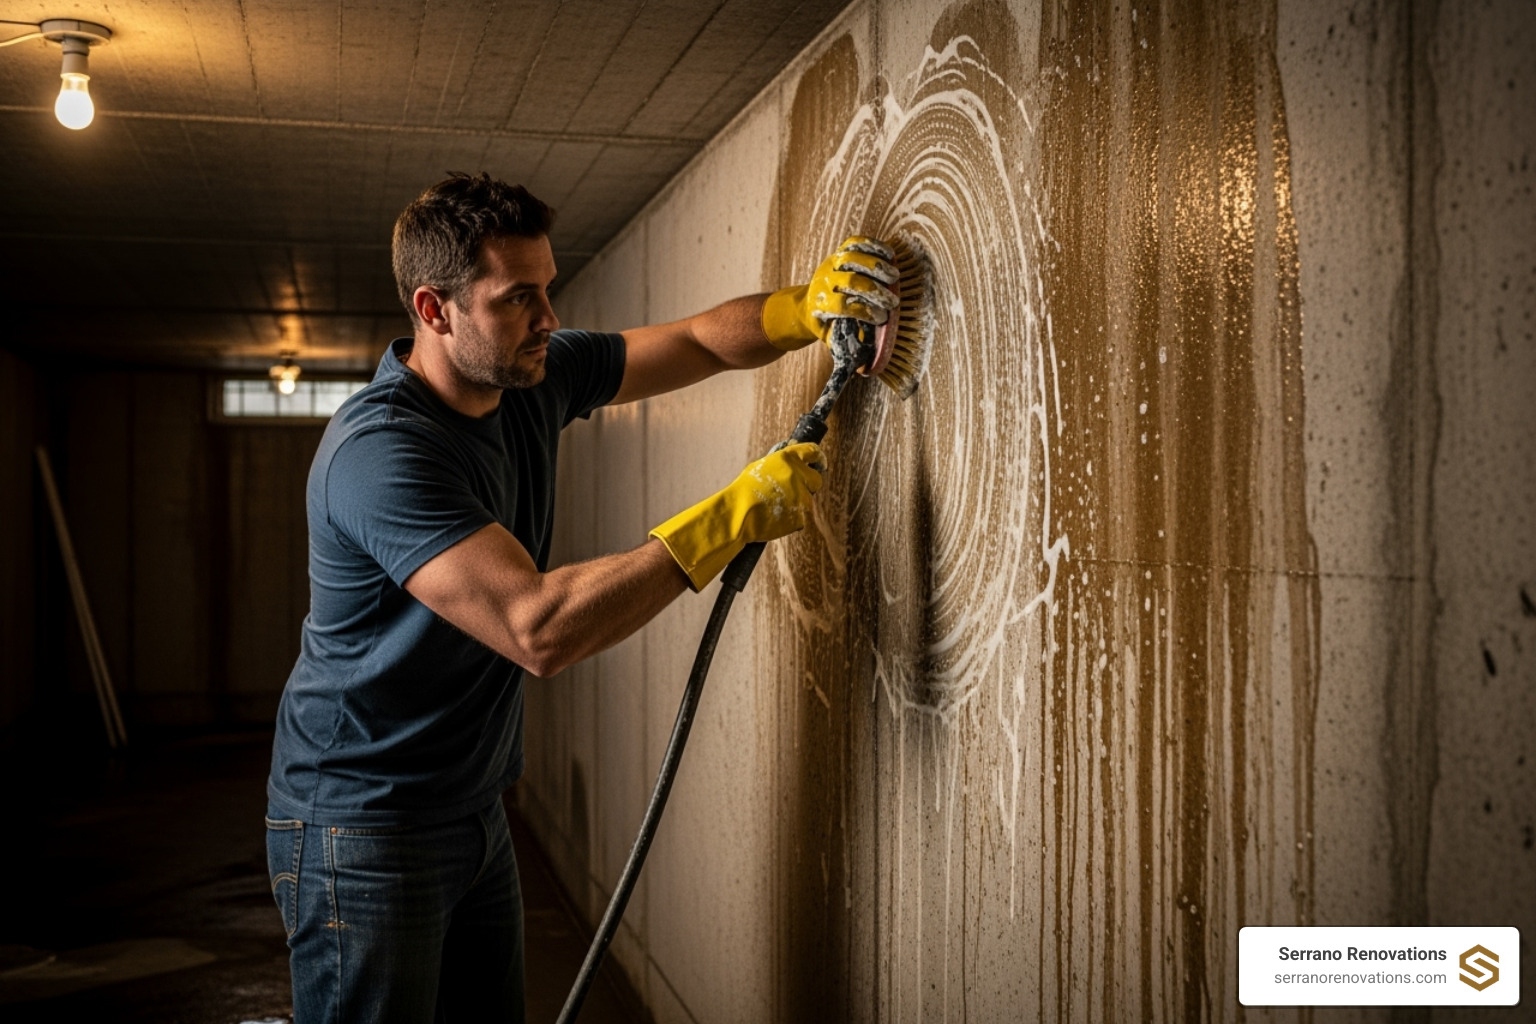
Start with the heavy lifting. Use a shovel to remove thick mud and debris from floors and surfaces. It’s messy work, but getting the bulk of the contamination out first makes the detailed cleaning much easier.
Scrub everything with detergent and water. Work from the top down – walls first, then floors. This prevents clean surfaces from getting re-contaminated by drips from above. Rinse frequently to avoid just spreading the mess around.
Disinfection is where you win the battle against mold and bacteria. Mix three-quarters cup of household bleach with one gallon of water for an effective disinfecting solution. This works great on hard, non-porous surfaces like concrete walls and metal fixtures.
Ventilation is crucial when using bleach. Open windows and run fans to keep air moving. Never mix bleach with other cleaning products – the chemical reactions can create dangerous gases.
The EPA has published comprehensive mold cleanup guidelines that provide research-backed methods for safe and effective cleanup. Following their recommendations ensures you’re not just making things look clean, but actually eliminating health hazards.
Keep your protective gear on throughout the cleaning process. Mold spores love to become airborne when you’re scrubbing and moving items around. Your respiratory protection is just as important during cleanup as it was during the initial water removal.
Salvage or Scrap? A Realistic Guide to Post-Flood Sorting
Solid wood furniture and metal items usually make the cut. These materials can handle moisture better than their composite counterparts and respond well to proper cleaning and drying.
Electronics get tricky. If they were turned off when the flooding happened and you can get them completely dry within 48 hours, they might survive. But if contaminated water was involved, it’s safer to replace them.
Books and papers can sometimes be saved through freeze-drying, but this requires professional help and only makes sense for truly irreplaceable items.
Some items are always goners. Saturated insulation, particle board furniture, mattresses, and contaminated food need to go straight to the trash. Carpeting and padding that’s been soaked also typically can’t be saved, especially if the water was contaminated.
| Usually Salvageable | Sometimes Salvageable | Always Discard |
|---|---|---|
| Solid wood furniture | Electronics (if dried quickly) | Saturated insulation |
| Metal items | Leather goods | Particle board furniture |
| Glass and ceramics | Books (if dried properly) | Mattresses and pillows |
| Hard plastic items | Small appliances | Contaminated food |
| Tools | Photographs | Carpeting and padding |
The type of water matters too. Clean water from a burst pipe gives you better odds than sewage backup or flood water that’s picked up contaminants from outside. When in doubt, err on the side of caution – your family’s health is worth more than any possession.
Step 4: Future-Proofing Your Foundation – Causes and Prevention
Understanding why your basement flooded is crucial for preventing future disasters. In Florida, we deal with unique challenges including heavy seasonal rains, high water tables, and aging infrastructure.
Common causes of basement flooding include:
- Poor exterior grading – Water should flow away from your foundation, not toward it
- Clogged gutters and downspouts – These direct roof water toward your foundation when blocked
- Foundation cracks – Even small cracks can allow significant water intrusion
- Sump pump failure – Whether from power outages or mechanical failure
- Sewer line backup – Overwhelmed municipal systems or blockages
- Hydrostatic pressure – Groundwater pushing against foundation walls
Prevention strategies require a multi-layered approach:
Improving drainage around your property is often the most cost-effective prevention method. Ensure your yard slopes away from the foundation at least one inch per foot for the first six to eight feet.
Sealing foundation cracks promptly prevents small problems from becoming big ones. Use appropriate sealants for your foundation type, and consider professional assessment for larger cracks.
Sump pump installation and maintenance is crucial in flood-prone areas. Consider a battery backup system for power outages, which are common during severe weather.
A backwater valve prevents sewer backup during heavy rains when municipal systems become overwhelmed. This is especially important in older neighborhoods with combined storm and sewer systems.
For comprehensive basement improvements, experienced Basement Remodelers Near Me can integrate flood prevention into renovation projects.
Understanding Your Insurance Coverage
Insurance coverage for basement flooding is complicated and often misunderstood. Standard homeowner’s insurance typically covers sudden and accidental water damage from internal sources like burst pipes or appliance failures.
What’s usually NOT covered:
- Overland flooding from storms or rivers
- Groundwater seepage
- Gradual leaks or maintenance issues
- Standard sump pump failure (though riders are available)
Flood insurance is separate and must be purchased through the National Flood Insurance Program (NFIP) or private insurers. It covers damage from overland flooding but has a 30-day waiting period before taking effect.
Review your policy annually and understand exactly what’s covered. Many homeowners find coverage gaps only after experiencing flooding.
Advanced Basement Flooding Remediation: Waterproofing and System Upgrades
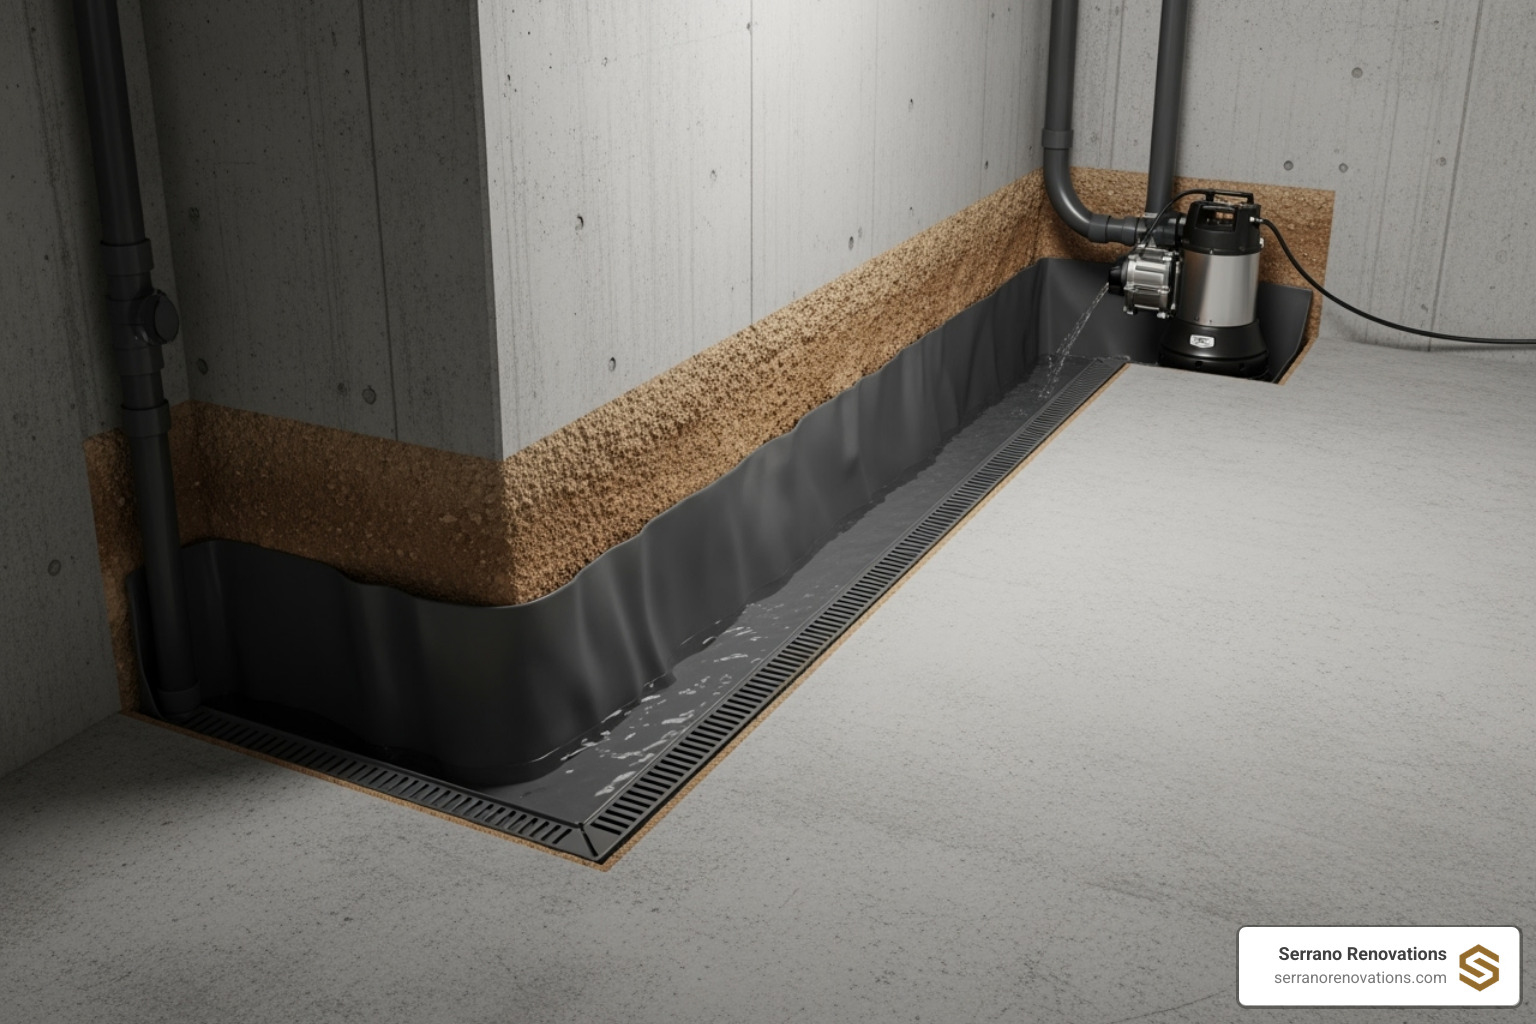
Interior waterproofing involves installing drainage systems inside your basement that collect water and direct it to a sump pump. This approach works well for existing homes where exterior excavation isn’t practical.
Exterior waterproofing requires excavating around the foundation to apply waterproof membranes and install drainage systems. While more expensive, it’s often more effective for severe water intrusion problems.
Sump pump systems with battery backups are essential in areas prone to power outages during storms. Consider water-powered backup pumps as a secondary option that doesn’t rely on electricity.
French drains collect and redirect groundwater away from your foundation. They’re particularly effective in areas with high water tables or poor natural drainage.
Professional assessments can identify the best combination of solutions for your specific situation. For major renovations that include waterproofing, Complete Home Renovation services can integrate flood prevention into broader improvement projects.
Frequently Asked Questions about Basement Flooding
How long does it take for a flooded basement to dry completely?
This is the question every homeowner asks, and honestly, the answer isn’t what most people want to hear. Drying time varies dramatically depending on how much water you’re dealing with, what got wet, and what equipment you’re using.
Professional restoration teams typically achieve initial drying within 3-5 days when they bring in the big guns – industrial fans, commercial dehumidifiers, and proper air circulation systems. But here’s the catch: initial drying doesn’t mean complete drying.
Concrete floors are notorious moisture hoarders. They might look and feel dry on the surface, but can hold water for weeks underneath. Wood floors are even trickier – they can take up to six weeks to completely dry out. This is why those moisture meters we mentioned earlier are so important. They detect hidden moisture that your eyes and hands can’t catch.
Don’t rush this phase. We’ve seen too many homeowners think they’re done after a few days, only to find mold growing weeks later. Incomplete drying is the leading cause of secondary damage after flooding.
Is it safe to stay in my house if the basement is flooded?
This depends on your specific situation, but safety should always be your top priority. Some scenarios require immediate evacuation, while others might allow you to stay with proper precautions.
You need to evacuate immediately if you smell gas, suspect gas leaks, or see obvious electrical hazards. Water containing sewage or chemicals also means everyone needs to get out until professionals can assess the situation. If you notice any structural damage – sagging floors, cracks in walls, or foundation issues – don’t take chances.
Air quality becomes a concern quickly as mold begins growing within 24-48 hours. Even if your main living areas seem fine, mold spores can travel throughout your house via HVAC systems. The contaminated air can cause respiratory problems, especially for children, elderly family members, or anyone with existing health conditions.
When in doubt, stay elsewhere until a professional assessment confirms it’s safe to return. A hotel bill is much cheaper than a hospital bill.
Does homeowner’s insurance cover basement flood damage?
This is where things get complicated, and unfortunately, many homeowners find out about coverage gaps only after they’re standing in a flooded basement.
Standard homeowner’s insurance typically covers sudden, accidental water damage from internal sources. Think burst pipes, water heater failures, or appliance malfunctions. If your washing machine hose suddenly breaks and floods your basement, you’re probably covered.
What’s usually NOT covered includes natural flooding from storms or rising water, groundwater seepage that happens gradually, and standard sump pump failure. Many policies also exclude gradual leaks or maintenance issues that you should have caught and fixed.
Separate flood insurance is required for weather-related flooding and overland water damage. This coverage is available through the National Flood Insurance Program or private insurers, but there’s typically a 30-day waiting period before it takes effect.
Here’s our advice: Review your specific policy and consider additional coverage based on your risk factors. Many homeowners in Florida benefit from sump pump failure riders and additional water damage coverage. Don’t wait until you’re dealing with water damage to find out what’s covered and what isn’t.
The insurance landscape is constantly changing, so have an honest conversation with your agent about your specific risks and coverage options. It’s better to pay a little more in premiums than to face thousands in uncovered damages.
Conclusion
Basement flooding remediation doesn’t have to feel like the end of the world. Yes, it’s stressful. Yes, it’s messy. But it’s also completely manageable when you know what to do.
Think of it this way: you’ve just learned a skill that 98% of homeowners will need at some point. You now know how to prioritize safety first, act quickly to remove water, dry everything thoroughly, and most importantly – how to prevent it from happening again.
The magic happens in those first 24-48 hours. That’s your window to prevent mold from turning a water problem into a health hazard. Use that time wisely, but never sacrifice safety for speed. A flooded basement is inconvenient. A trip to the emergency room is life-changing.
Every flooded basement tells a story. Maybe yours was caused by that torrential downpour last Tuesday. Perhaps it was a burst pipe that decided to fail at 2 AM. Or maybe your trusty sump pump finally gave up after years of faithful service.
Whatever caused your flood, the path forward is the same: assess the damage, remove the water, dry everything completely, clean and disinfect properly, then figure out how to prevent round two.
Here in South Florida – whether you’re in Margate dealing with seasonal storms, or in Boca Raton managing an aging home’s plumbing – we understand that water and basements have a complicated relationship. Our climate doesn’t make it easy, but that’s exactly why preparation matters so much.
Sometimes the damage goes beyond what any homeowner should tackle alone. Sewage backup, extensive structural damage, or contaminated water require professional expertise. There’s no shame in calling for help – there’s wisdom in knowing your limits.
When you’re ready to move beyond emergency mode and start thinking about rebuilding better than before, that’s where comprehensive restoration comes in. Whether you need immediate help or want to discuss turning this disaster into an opportunity for improvement, experienced Remediation Company Near Me professionals can guide you through both emergency response and long-term solutions.
Your basement flooding story doesn’t end with the flood. It ends with a dry, safe, and maybe even better space than you had before. Every challenge is also an opportunity to build something stronger.
Take a deep breath. You’ve got this. And when you don’t, you know who to call.
Comments