

Why Proper Gym Flooring Installation Transforms Your Home Workout Experience
Gym flooring installation is the foundation of creating a safe, functional, and motivating home workout space that protects both your body and your existing floors.
Quick Installation Overview:
- Choose your flooring type – rubber tiles/rolls, foam tiles, vinyl, or turf
- Prepare the subfloor – clean, level, and dry surface
- Acclimate materials for 24-48 hours at room temperature
- Plan your layout starting from the center outward
- Install using interlocking, adhesive, or tape methods
- Secure edges and transitions between different areas
As one professional installer notes: “A good gym floor is like that supportive gym buddy who’s always got your back – or in this case, your joints.”
Installing gym flooring might seem overwhelming, but it’s actually one of the most rewarding home improvement projects you can tackle. The right flooring transforms a cold concrete basement or spare room into a professional-grade fitness space that rivals commercial gyms.
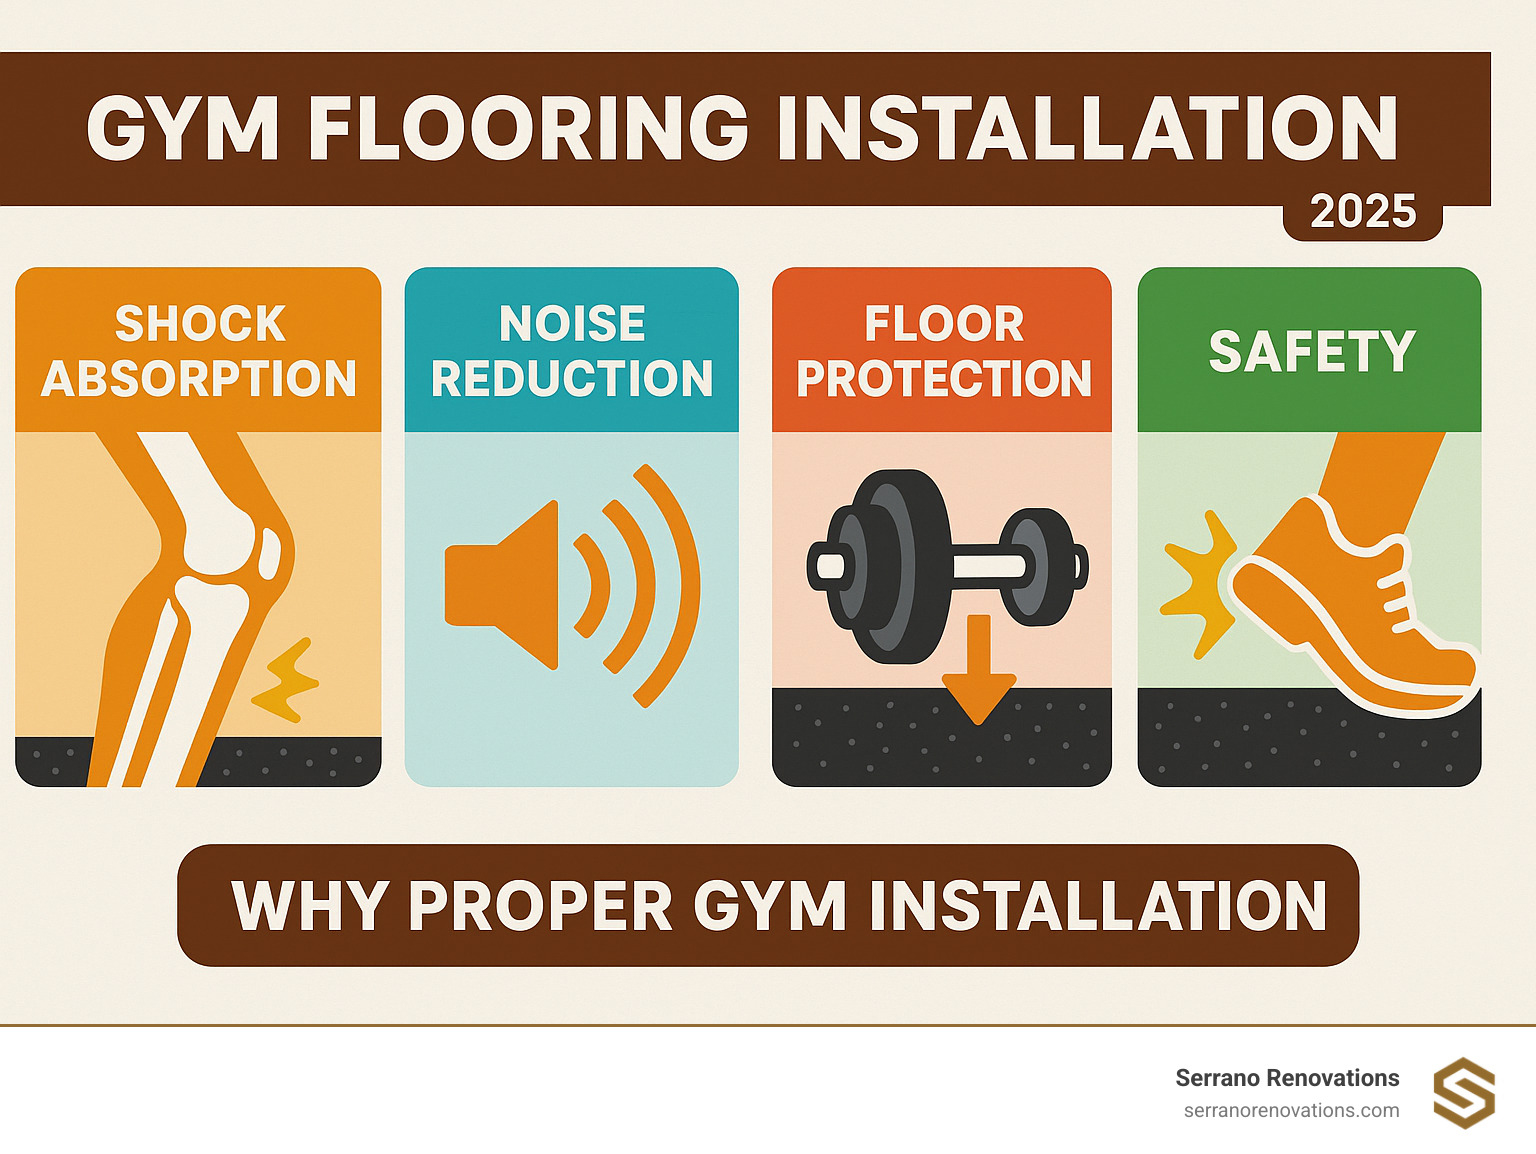
The benefits go far beyond aesthetics. Quality gym flooring provides crucial shock absorption that protects your joints during high-impact workouts. It dramatically reduces noise – no more angry neighbors when you’re crushing your morning routine. Most importantly, it creates a safer environment by preventing slips and protecting your existing floors from heavy equipment damage.
Whether you’re setting up a simple yoga space or a full powerlifting setup, understanding the installation process helps you make informed decisions about materials, methods, and whether to DIY or hire professionals.
Step 1: Choose Your Champion – Selecting the Right Gym Flooring
Think of choosing gym flooring like picking a workout buddy – you need someone reliable who’ll support you through every rep, drop, and jump. The right flooring can make or break your gym flooring installation project, so let’s find your perfect match.
| Flooring Type | Durability | Shock Absorption | Ideal Use | Installation Method |
|---|---|---|---|---|
| Rubber Tiles/Rolls | Excellent (10-15 years) | High | Heavy lifting, HIIT | Interlocking or adhesive |
| Foam Tiles | Good (2-5 years) | Excellent | Yoga, light cardio | Interlocking |
| Vinyl (LVT) | Excellent (10-20 years) | Moderate | Dance, aerobics | Adhesive or click-lock |
| Artificial Turf | Good (5-10 years) | Low | Sled pushes, agility | Adhesive with tape strips |
Understanding Flooring Types and Characteristics
Rubber flooring is the heavyweight champion of home gyms. It’s tough enough to handle whatever you throw at it – literally. Drop those weights? No problem. The material bounces back while protecting your subfloor underneath.
What makes rubber truly special are its incredible sound-dampening properties. Your downstairs neighbors will thank you when you’re crushing your 6 AM workout routine. The shock absorption also means your joints stay happy, even during high-impact exercises.
Foam flooring is like having a personal cushion for every workout. These interlocking tiles offer amazing comfort for floor exercises and yoga sessions. At around 8 pounds per 24″ x 24″ tile, they’re incredibly easy to handle during installation.
The affordability factor makes foam tiles perfect for budget-conscious fitness enthusiasts. Just remember – they’re built for lighter activities, not heavy weightlifting sessions.
Vinyl flooring brings style to your sweat sessions. Modern luxury vinyl tiles don’t just look good – they’re surprisingly tough and incredibly easy to clean. Spilled your post-workout protein shake? A quick mop takes care of it.
The aesthetic variety means you can create a space that actually motivates you to work out. Who says functional can’t be beautiful?
Artificial turf transforms your basement into a training field. It’s perfect for sled pushes, bear crawls, and agility drills that need serious grip and traction. The texture gives you that outdoor training feel without leaving your home.
How to Choose the Right Thickness
Thickness isn’t just about comfort – it’s about matching your flooring to how hard you actually train. Getting this wrong means either overpaying for features you don’t need or ending up with a floor that can’t handle your workouts.
8mm thickness works perfectly for most home gyms. If you’re mainly doing cardio, bodyweight exercises, or using standard gym equipment, this thickness gives you great protection without breaking the bank.
9mm thickness steps up the game for serious home athletes. This extra millimeter makes a real difference if you occasionally drop weights or use bumper plates. It’s the sweet spot for most dedicated home gym owners.
12mm thickness is built for the heavy hitters. Olympic lifts, frequent weight drops, and intense HIIT sessions demand this level of protection. Your floor – and your joints – will thank you for the extra cushioning during those demanding workouts.
Step 2: The Groundwork – Preparing Your Subfloor for Installation
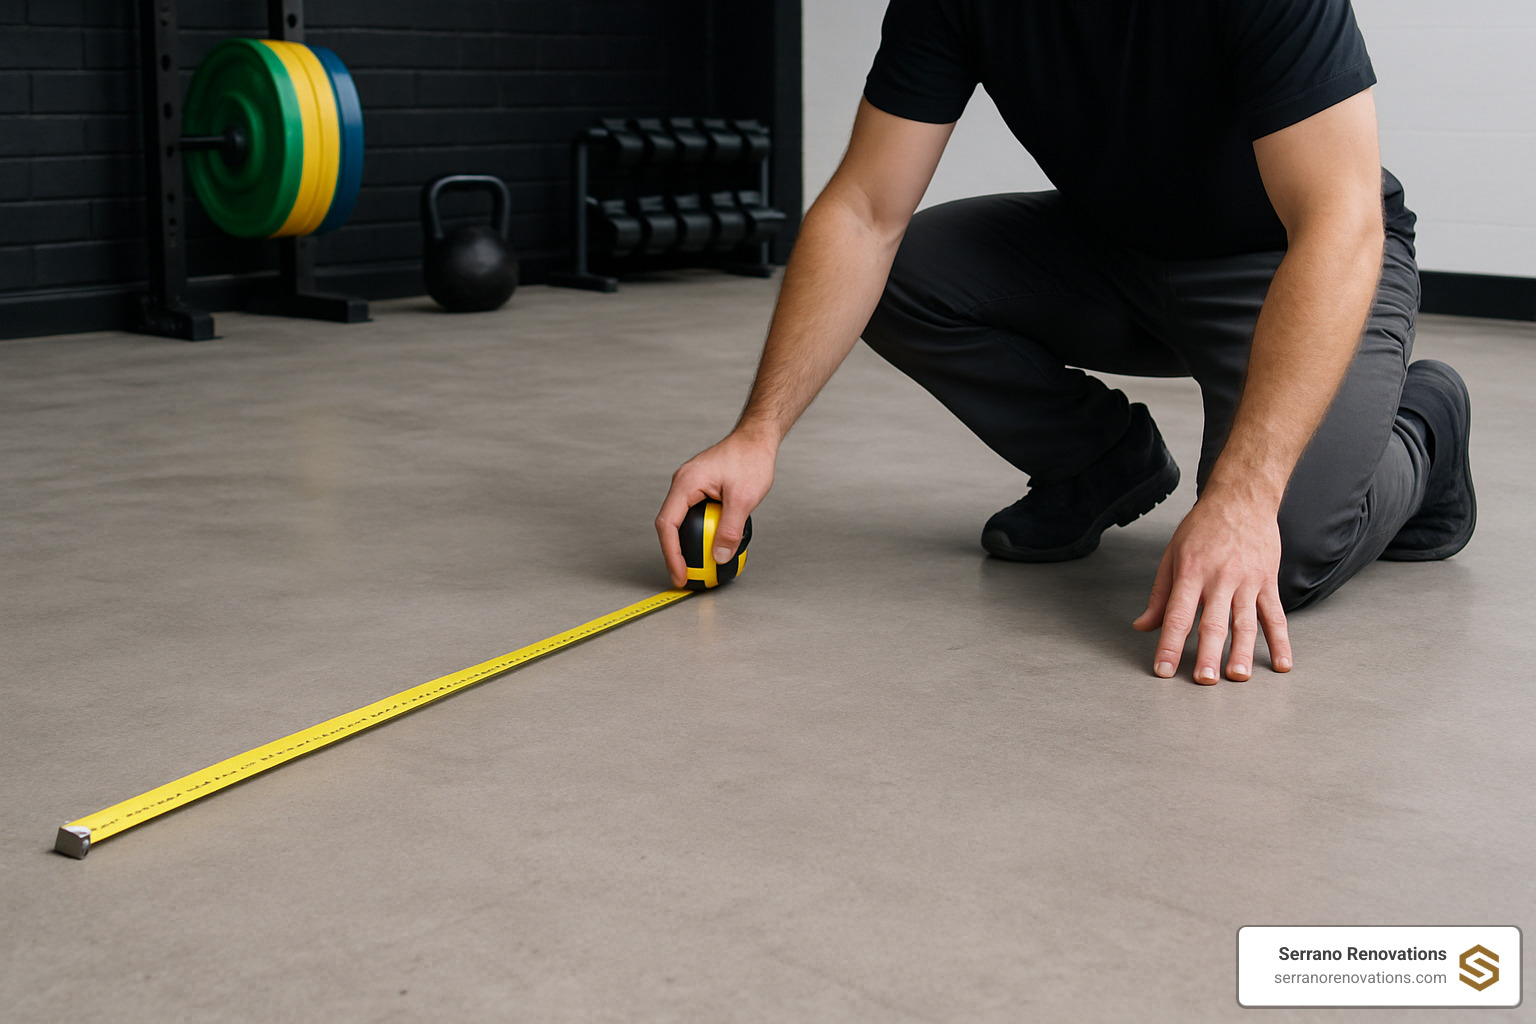
Think of subfloor preparation as the foundation of your entire gym flooring installation project. Just like you wouldn’t build a house on shaky ground, you can’t expect professional results from flooring installed over a poorly prepared surface.
The truth is, most flooring failures happen because someone skipped this crucial step. Your subfloor needs to be three things: clean, dry, and level. Miss any one of these, and you’ll be dealing with problems that could have been easily avoided.
Prepping Different Subfloor Surfaces
Concrete subfloors are what you’ll encounter in most basements and garages. Start by giving the surface a thorough cleaning – we’re talking about removing every speck of dust, debris, and that mysterious concrete powder that seems to appear overnight.
Here’s a simple moisture test that could save you headaches later: tape a 2×2 foot piece of plastic sheeting to the concrete and wait 24 hours. If you see condensation underneath, you’ve got moisture issues that need addressing before any flooring goes down.
Small cracks under ¼ inch can be filled with concrete crack filler. For larger problems or uneven areas, self-leveling compound works like magic to create that smooth foundation your new flooring deserves.
Hardwood subfloors require a gentler approach. The key here is protecting your existing floor while creating a stable base. Lay down craft paper as a protective barrier – this prevents the rubber from staining your beautiful hardwood and stops chemical reactions between rubber and certain wood finishes.
Ceramic tile subfloors present their own challenges. Walk around and check for loose tiles by listening for hollow sounds when you tap them. Deep grout lines need to be filled with leveling compound because rolled rubber will show every ridge and inconsistency, creating an unprofessional look.
When to Avoid Certain Flooring Types
Sometimes the best installation advice is knowing when not to install. Certain situations spell trouble for gym flooring installation, and recognizing them early saves time, money, and frustration.
Uneven surfaces with significant gaps or height differences are problematic for any flooring type. High-moisture areas without proper vapor barriers create perfect conditions for mold growth underneath your flooring. Installing over high-pile carpet creates instability and tripping hazards that turn your safe workout space into an accident waiting to happen.
Basements without vapor barriers are particularly tricky. The moisture that naturally moves through concrete can get trapped under your flooring, leading to mold, mildew, and that musty smell that ruins even the best workout motivation.
The Main Event: Your Step-by-Step Gym Flooring Installation Guide
Here’s where the magic happens – your gym flooring installation transforms from planning to reality! But before you jump in with both feet, let’s talk about patience. Your flooring materials need time to get comfortable in their new home, just like you do.
Allow your materials to acclimate for 24-48 hours at room temperature. This isn’t just busy work – it prevents your beautiful new floor from expanding or shrinking after installation, which could create gaps or buckling that’ll drive you crazy later.
While your flooring is getting cozy, plan your layout strategy. Start from the center of the room and work outward – this creates that balanced, professional look that makes people think you hired experts. Use a chalk line to mark your starting point and keep everything straight. Trust me, nothing screams “amateur hour” like flooring that goes wonky halfway across the room.
Cutting and Customizing for a Perfect Fit
This is where precision meets personality. Use a sharp utility knife with plenty of spare blades on hand – rubber flooring eats through blades like a teenager goes through snacks. Keep that straight edge or T-square handy for clean, professional cuts.
When you’re cutting around obstacles like pillars or doorways, remember the carpenter’s golden rule: measure twice, cut once. Complex shapes around doorways can be tricky, so don’t be shy about making a cardboard template first. It’s much cheaper to mess up cardboard than expensive flooring.
Here’s a pro tip that’ll save you headaches: leave a ¼-inch expansion gap between your flooring and the walls. Materials expand and contract with temperature changes, and this little breathing room prevents your floor from buckling when things heat up during those intense workout sessions.
Securing Your Floor: A Guide to Gym Flooring Installation Methods
You’ve got three main ways to secure your floor, and each has its place depending on your situation and commitment level.
The interlocking method is like adult Legos – puzzle tiles that snap together without any adhesive. It’s perfect for DIY beginners and gives you the flexibility to reconfigure your space later. Use a rubber mallet to ensure tight connections, but gentle taps are your friend here. You’re coaxing the pieces together, not demolishing them.
The adhesive method means business – this creates a permanent installation that’s ideal when you’re committed to your gym space. Apply adhesive evenly with a trowel, working in sections you can handle (usually about 90 square feet per gallon of rubber flooring glue). The key is proper curing time – usually 24-48 hours before you can really put it through its paces.
The double-sided tape method splits the difference – it’s more secure than interlocking but easier to remove than full adhesive. Focus on securing the perimeters and all seams with high-quality tape designed specifically for flooring. This semi-permanent solution works great for renters or anyone who likes to keep their options open.
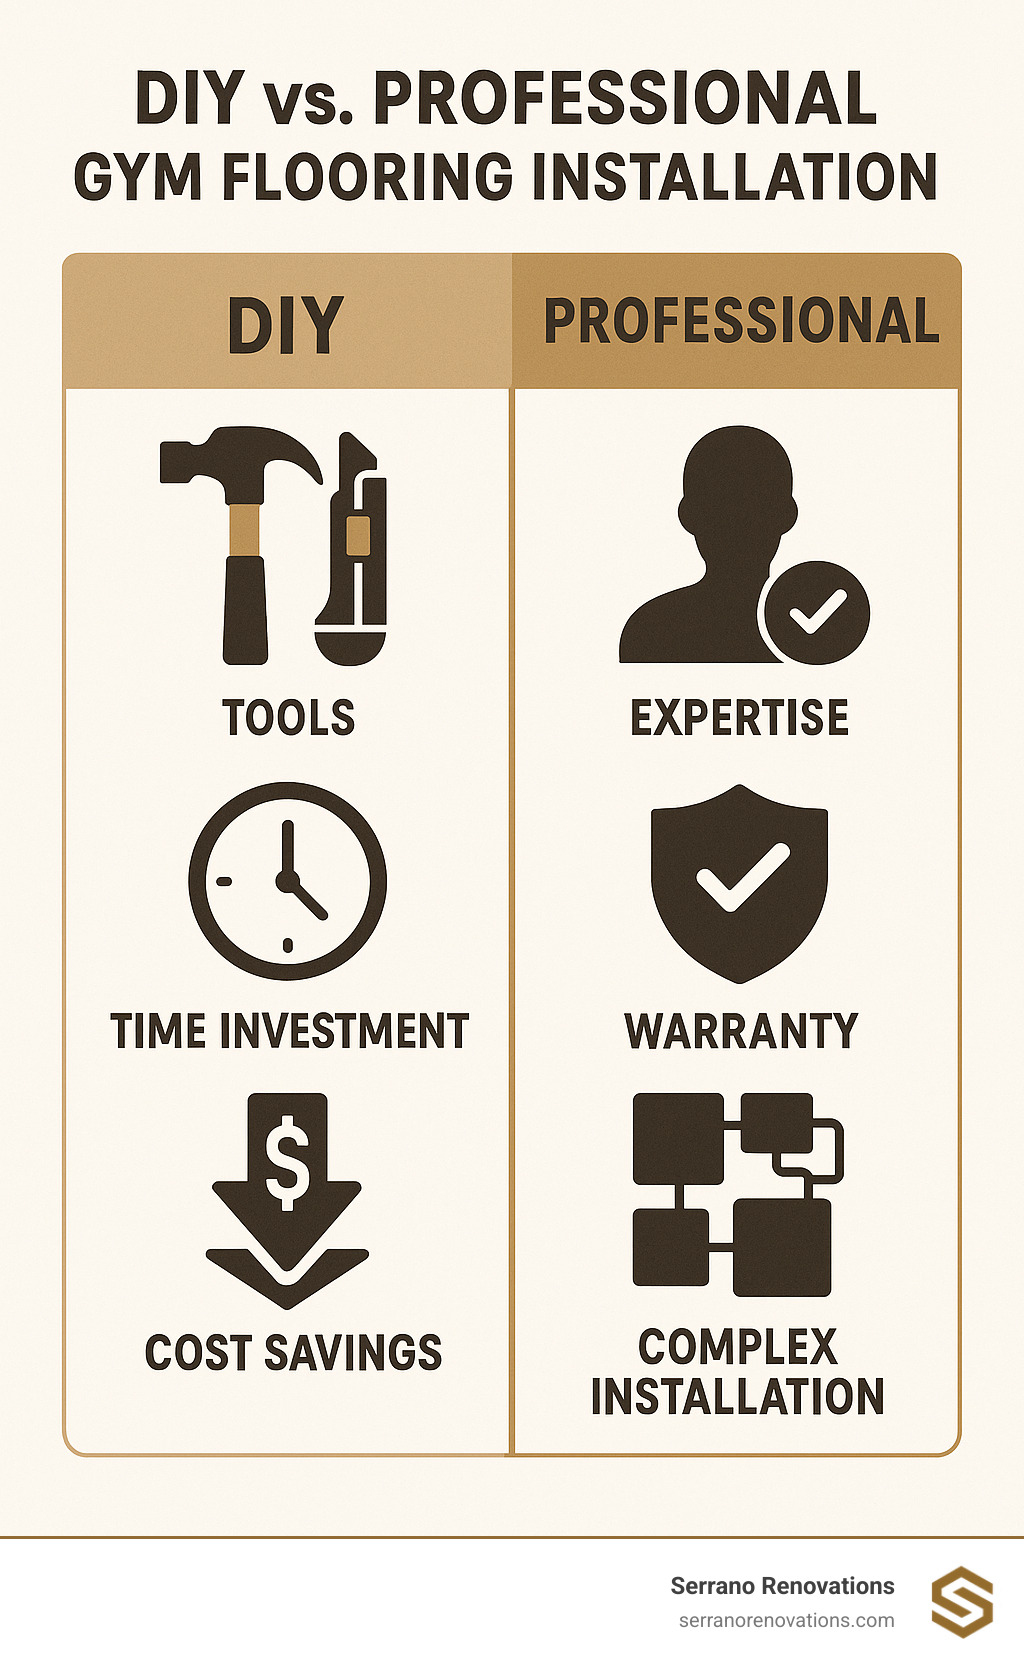
DIY or Call the Pros? Making the Smart Choice
Here’s the truth about gym flooring installation – it’s one of those projects that sits right on the fence between “totally doable weekend project” and “maybe I should call someone who knows what they’re doing.” The good news? Most homeowners can absolutely tackle this themselves with the right preparation and realistic expectations.
The decision really comes down to your comfort level, available time, and the complexity of your specific situation. Think of it like learning a new exercise – some people jump right into advanced moves, while others prefer to master the basics first.
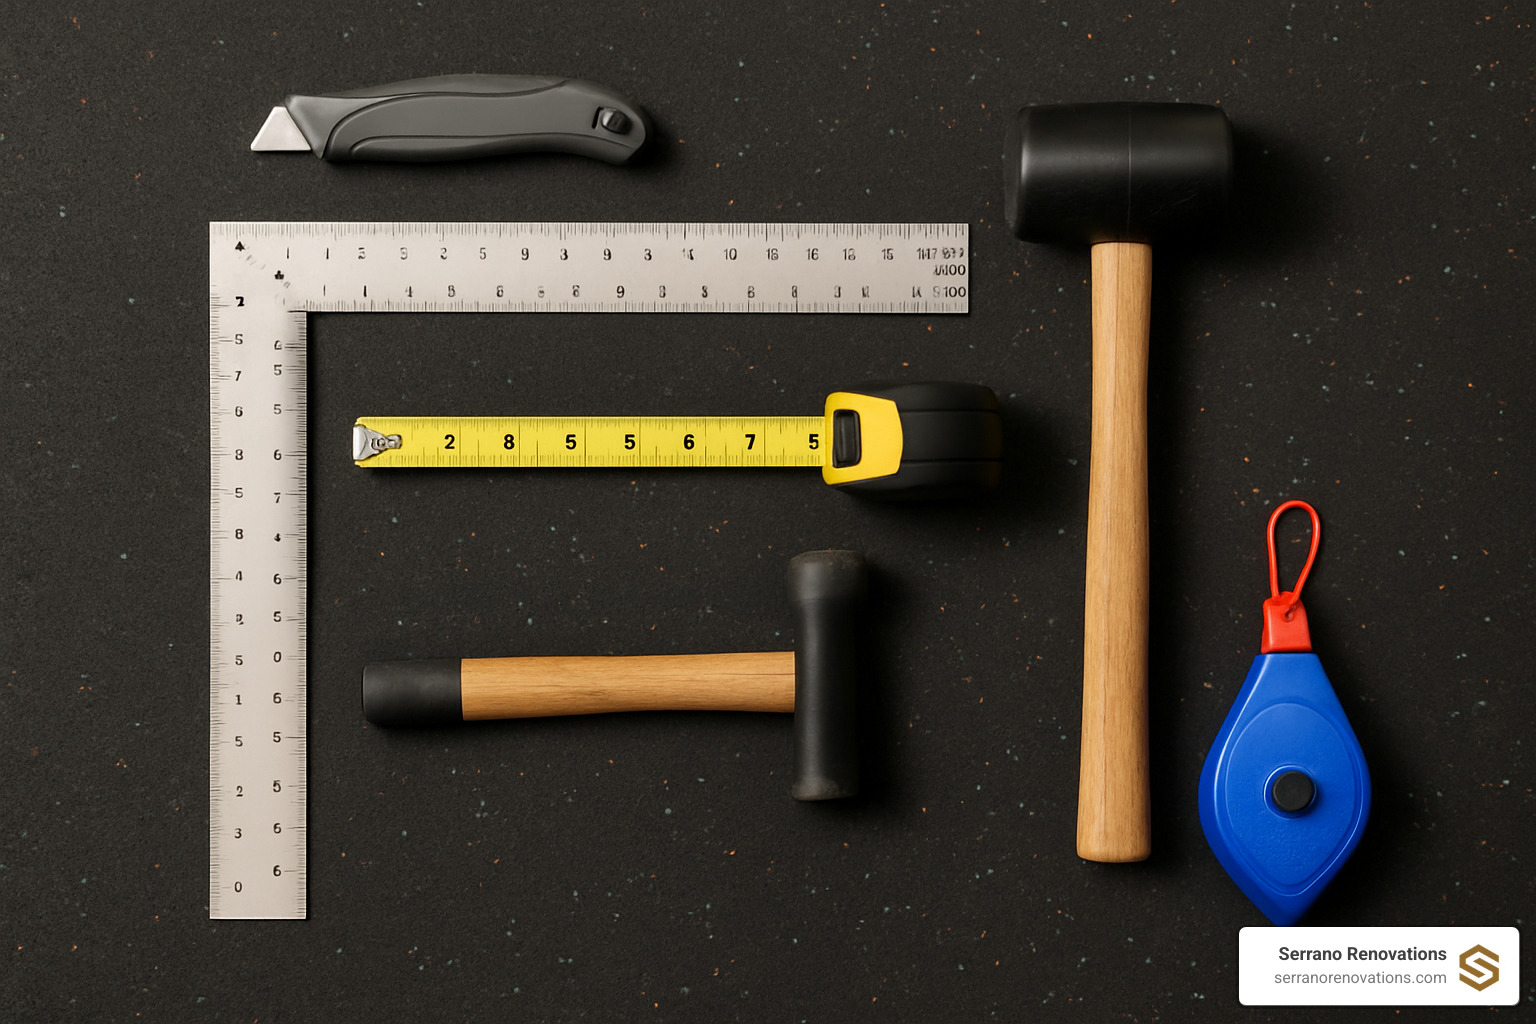
Essential Tools for DIY Gym Flooring Installation
If you’re feeling confident about going the DIY route, having the right tools is like having a good spotter at the gym – absolutely essential for success:
- Utility knife with extra blades – Seriously, buy more blades than you think you need. Rubber flooring eats through them like a hungry teenager raids the fridge
- Straight edge or T-square – This is your secret weapon for cuts that look professional instead of like you used a butter knife
- Measuring tape – Because “close enough” works great for estimating pizza slices, not so much for flooring
- Chalk line – Creates those perfectly straight reference lines that separate the pros from the “well, it’s mostly straight” crowd
- Rubber mallet – Essential for interlocking tiles, and please don’t use a regular hammer (your tiles will thank you)
- Heavy roller – For adhesive installations, this eliminates air bubbles and ensures proper bonding
Most of these tools are relatively inexpensive and useful for other home projects too. Think of it as building your home improvement toolkit while creating an awesome workout space.
When to Hire a Professional
Some situations practically scream for professional help, and there’s no shame in recognizing when you’ve met your match. Heavy materials are the first red flag – commercial rubber rolls can weigh over 200 pounds per 25-foot section. Wrestling with that kind of weight isn’t just difficult, it’s potentially dangerous without proper equipment and technique.
Complex room layouts with multiple obstacles, weird angles, or elevation changes can turn a straightforward installation into a geometric puzzle that would make your high school math teacher proud (and you frustrated). If your space has lots of pillars, built-in equipment, or irregular shapes, professional expertise pays for itself.
Subfloor repair is another area where DIY enthusiasm often meets reality. If your concrete needs significant leveling, your hardwood needs protection, or you’re dealing with moisture issues, these foundational problems need proper solutions before any flooring goes down.
Hardwood gym floor installation requires specialized knowledge about moisture levels, acclimation periods, and finishing techniques that go well beyond typical DIY skills. This isn’t the time to learn through trial and error.
At Serrano Renovations, we’ve seen plenty of “simple” installations that turned complicated fast. Our team specializes in those tricky situations where experience makes all the difference between a floor that looks great for years and one that starts showing problems within months. Find expert remodeling contractors who understand that gym flooring installation is about more than just laying down material – it’s about creating a foundation for your fitness goals.
The bottom line? If you’re feeling confident about your skills and your installation is relatively straightforward, DIY can be incredibly rewarding. But if you’re dealing with heavy materials, complex layouts, or subfloor issues, professional installation ensures you get the results you’re dreaming of without the headaches.
Post-Installation Care for Lasting Performance

Congratulations! Your gym flooring installation is complete, but like any great workout routine, consistency is key to long-term success. Taking care of your new floor doesn’t require a PhD in maintenance – just a few simple habits that’ll keep it looking and performing like new.
Think of your gym floor like a reliable workout partner. Treat it well, and it’ll support you through thousands of workouts. Neglect it, and you’ll both end up disappointed.
Routine cleaning is surprisingly simple. A quick sweep or vacuum after each workout removes the dust and debris that can gradually wear down your flooring. It’s like wiping down equipment after use – basic gym etiquette that pays dividends.
For deeper cleaning, grab a damp mop and a pH-neutral cleaner. This is crucial because harsh chemicals are like kryptonite to rubber flooring. Avoid anything with bleach, ammonia, or strong acids. Your floor will thank you by maintaining its rich color and flexibility for years.
Spill management becomes second nature once you get into the habit. Whether it’s a protein shake explosion or sweat puddles after an intense HIIT session, clean spills immediately. Most quality gym flooring resists stains beautifully, but prompt attention keeps everything looking professional.
The flooring industry uses rigorous DIN athletic testing standards for performance to measure how well gym floors handle shock absorption and durability. Your proper maintenance helps preserve these performance characteristics that protect your joints and improve your workouts.
Keep an eye out for any issues – loose tiles, damaged sections, or unusual wear patterns. Small problems are like minor injuries – address them quickly before they become major headaches. If you notice anything concerning, don’t hesitate to reach out to professionals who understand gym flooring inside and out.
For complex repairs or refinishing needs, expert flooring renovation services can restore your floor’s integrity and appearance. Sometimes a professional touch makes all the difference in extending your floor’s lifespan and maintaining that fresh installation look.
Frequently Asked Questions about Gym Flooring Installation
Let’s tackle the most common questions we hear about gym flooring installation. These are the real-world concerns that pop up when you’re knee-deep in planning your dream home gym.
Can I install new gym flooring over my existing carpet?
Here’s the straight answer: generally not recommended for rolls or thin tiles. Think of it like trying to do squats on a waterbed – you’re not getting the stability you need for a safe workout.
Carpet creates an unstable foundation that can bunch up and create tripping hazards. Plus, the soft surface underneath actually works against your flooring’s shock absorption properties. It’s like having a shock absorber on top of another shock absorber – sounds good in theory, but it doesn’t work that way in practice.
The moisture factor is another concern. Carpet can trap sweat and spills, creating a breeding ground for mold and bacteria between your flooring and the carpet below.
However, raised interlocking plastic tiles can sometimes work over low-pile carpet. These thicker tiles (around 9/16 inch) create their own stable platform. But honestly, the best practice is always to remove carpet and install over a solid subfloor for optimal performance and safety.
What’s the difference between installing temporary vs. permanent gym flooring?
This is really about your lifestyle and long-term plans. Temporary setups use interlocking tiles or loose-lay mats that snap together like puzzle pieces. They’re perfect for renters, people who love rearranging their space, or anyone using a multi-purpose room.
The beauty of temporary installations is the flexibility. Want to expand your workout area for a party? No problem. Moving to a new house? Your flooring comes with you. Installation is quick and requires no adhesives – just your time and a rubber mallet.
Permanent setups use adhesive or heavy rolls that create maximum stability. These installations look more professional and offer the most solid foundation for heavy lifting and intense workouts. They’re ideal for dedicated gym spaces where you want that commercial gym feel.
The trade-off is commitment. Removing permanent flooring takes effort and may require professional help, especially with adhesive installations.
How do I clean my new rubber gym floor?
Good news – rubber flooring is surprisingly low-maintenance! Regular sweeping or vacuuming removes the dirt and debris that can act like sandpaper on your beautiful new floor.
For deeper cleaning, mop with a damp cloth and a pH-neutral cleaning solution. Think of it like washing your car – you wouldn’t use dish soap on your paint, and you shouldn’t use harsh chemicals on your gym floor.
Avoid solvent-based or acidic cleaners that can damage the rubber surface. These include anything with ammonia, bleach, or strong acids. When in doubt, check the manufacturer’s recommendations.
The secret to easy maintenance is consistency. A quick sweep after each workout and a weekly mop keeps your floor looking new for years. It’s much easier than trying to deep-clean neglected flooring later.
Conclusion
Gym flooring installation transforms more than just your workout space – it transforms your entire fitness experience. The safety benefits protect your joints during those intense HIIT sessions and reduce injury risk when you’re pushing your limits. The durability ensures your investment lasts for years of sweat, tears, and personal victories. The aesthetic appeal creates a motivating environment that makes you actually want to use your gym instead of turning it into an expensive clothes rack.
Whether you choose the DIY route or hire professionals, the key is understanding the process and making informed decisions about materials and methods. From selecting the right thickness for your workout style to properly preparing your subfloor, each step contributes to the final result. Cutting corners during installation often leads to problems that cost more to fix than doing it right the first time.
The journey from bare concrete to professional-grade gym floor might seem daunting, but thousands of homeowners have successfully transformed their spaces. Some find they love the precision and satisfaction of DIY installation. Others find peace of mind in professional installation, knowing their floor will perform flawlessly for years to come.
At Serrano Renovations, we understand that exceptional craftsmanship and clear communication are essential for any home improvement project. Our commitment goes beyond standard service – we’re here to help you fulfill your dreams of the perfect home gym space. We’ve seen how the right flooring can motivate someone to finally stick with their fitness goals, and that’s incredibly rewarding.
The perfect gym floor doesn’t exist, but the perfect gym floor for you absolutely does. Take your time, do your research, and don’t hesitate to seek professional help when the project calls for it. Your future self will thank you every time you step into your perfectly floored home gym, whether you’re crushing a morning workout or winding down with evening yoga.
Ready to transform your workout space? Get started on your professional flooring installation today! Whether you’re in Margate, Boca Raton, Miami, or anywhere in Broward County, we’re here to help you create the home gym of your dreams.
Comments